

Sticky, sweet, and utterly addictive.
There’s something about a chewy honey cookie that pulls you in like a warm embrace on a chilly afternoon. The scent of honey wafting through the kitchen, mingling with the faint vanilla notes, set the stage for a baking session that’s anything but ordinary. I remember the first time I nailed that perfect chewiness—no crumbly edges, just soft, luscious bites that begged for seconds.
Baking these cookies isn’t rocket science, but it does require a bit of finesse—like knowing when to pull them out of the oven just before they look done. Otherwise, you end up with dry, sad rocks that nobody wants to dunk in tea. Trust me, this is the kind of cookie where timing is everything. It’s the sweet spot between gooey and firm—the cookie’s own tightrope walk.
Get your mixing bowls ready, because once you taste these, you’ll be hooked. The honey adds depth, not just sweetness, giving these cookies a rustic charm that’s hard to resist. Plus, they’re easy—no fancy ingredients or complicated steps. Just good ingredients, simple technique, and a little patience. Ready to bake? Let’s dive in.
If you’re looking for a delicious gluten-free treat, you’ll love this Moist Pumpkin Bread Made with Almond Flour for Gluten-Free Mornings as much as a chewy honey cookie.
Real Life Wins with Chewy Honey Cookies
- Crazy easy to whip up—perfect when you need a sweet fix fast without a trip to the store.
- Soft, chewy texture that’s a legit crowd-pleaser—no dry cookie drama here.
- Honey’s natural sweetness means you’re not dumping a ton of processed sugar into the mix. Bonus for those watching their intake.
- Great for gift-giving or bringing to a potluck—cookies that vanish fast are always a good sign.
- Make ahead and freeze with zero fuss; pull them out for instant snack magic anytime.
Chewy Honey Cookies
- Total Time: 27 minutes
- Yield: 24 cookies 1x
Description
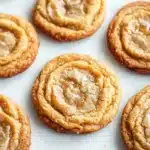
These chewy honey cookies are soft, sweet, and perfectly chewy with a rich honey flavor. Easy to make and ideal for a cozy treat or sharing with friends and family.
Ingredients
2 1/4 cups (280 grams) all-purpose flour
1/2 teaspoon baking soda
1/4 teaspoon salt
1/2 cup (115 grams) unsalted butter, softened
1/2 cup (160 grams) honey
1/2 cup (100 grams) granulated sugar
1 large egg
1 teaspoon vanilla extract
Instructions
Preheat the oven to 350°F (175°C). Line two baking sheets with parchment paper.
In a medium bowl, whisk together the all-purpose flour, baking soda, and salt. Set aside.
In a large bowl, use an electric mixer to cream the softened butter, honey, and granulated sugar together until smooth and creamy, about 2-3 minutes.
Add the egg and vanilla extract to the butter mixture and beat until fully combined.
Gradually add the dry ingredients to the wet ingredients, mixing on low speed until just combined. Do not overmix.
Using a tablespoon or cookie scoop, drop rounded spoonfuls of dough onto the prepared baking sheets, spacing them about 2 inches apart.
Bake in the preheated oven for 10-12 minutes, or until the edges are lightly golden but the centers still look soft.
Remove the cookies from the oven and allow them to cool on the baking sheets for 5 minutes before transferring to a wire rack to cool completely.
Store the cooled cookies in an airtight container at room temperature for up to 5 days.
- Prep Time: 15 minutes
- Cook Time: 12 minutes
Explore more:
Breakfast Recipes
Nailing That Perfect Chewy Honey Cookie
The Sweet Swap: Honey’s Role and Alternatives
Honey isn’t just a sweetener here—it’s the MVP for chewiness and that deep, floral flavor. But what if you’re fresh out or want to tweak the profile? Think molasses or maple syrup. Both bring sticky moisture and a unique character, though molasses will lean darker and heavier in taste, while maple syrup adds a subtly woody note. Just keep the liquid balance in mind—these swaps might require a slight tweak in flour to keep your dough from turning into a sticky mess. I once swapped honey with agave nectar, and the cookies came out softer but lost some of that signature honey bite. Lesson learned: honey’s gold here for texture and flavor. If you’re after that chewiness punch without honey, brown sugar can help, but the flavor profile shifts toward caramel.
Why That Creaming Step Means Business
Creaming butter, honey, and sugar until smooth and creamy—sounds basic, right? It’s the unsung hero behind those chewy gems. This step traps air into the fat, creating a tender crumb and subtle rise. But go ham here and you risk a cakey cookie. Under-mix, and your cookies will be dense and dull. I often tell bakers to think of this as coaxing your dough to breathe—it’s like a quick warm-up before the big game. Use room-temp butter for the easiest mix. Cold butter? You’ll be battling lumps. And don’t rush it; 2-3 minutes with an electric mixer is your sweet spot. You’ll see the mixture lighten in color and thicken slightly—a visual cue that signals your dough is ready for the dry ingredients.
Rescue Mission: Fixing Flat or Tough Cookies
Flat cookies are the bane of many bakers’ existence. If you pop your chewy honey cookies in the oven and they spread into sad little pancakes, check your butter situation first—too soft or melted butter equals cookie disaster. Refrigerate your dough for 20-30 minutes before baking to firm it up; this slows spread and helps hold shape. Another culprit? Overmixing once flour hits the party. Overworked dough develops gluten, resulting in tougher, less tender cookies. I’ve saved many batches by simply folding flour in gently with a spatula instead of whipping it high-speed.
Too tough? You might be baking too long or your oven runs hot. Keep an eye on those edges—they should be just golden, centers soft and inviting. And don’t skip the cooling step on the baking sheet; cookies continue to set there, firming up without drying out. Follow these tips, and your chewy honey cookies will keep friends coming back for more—no crumb left behind.
Chewy Honey Cookies FAQ
A1: You can, but expect a slight flavor detour. Maple syrup is thinner and less intense than honey, so your cookies might spread more and taste a bit less rich. It’s a solid swap if you’re out of honey, though.
A2: Absolutely! These cookies hold onto their chewy goodness for several days, especially if stored airtight. I’ve had batches last up to five days without turning into rock-hard relics, so no worries there.
A3: No. The sugar works alongside honey to create that perfect texture and subtle crunch on the edges—cutting it out messes with both taste and structure.
A4: Overmixing develops gluten, leading to tougher cookies. These are meant to be soft and chewy, so mix just until combined. Think of it like a gentle handshake, not a wrestling match.
A5: Yes, and here’s the scoop—pop them into a sealed container, freeze for up to 2 months, then thaw at room temp. I’ve reheated frozen cookies in a quick zap of the microwave, and they come back almost as fresh as day one.