
Let’s get zesty.
There’s something about lemon that wakes up your kitchen faster than a double espresso shot. The air thick with citrus, the countertop cluttered with powdered sugar, melted white chocolate dripping off the spoon—this is where magic happens. I remember the first time I tried to nail that perfect lemon cake pop design; it was a hit-or-miss affair with more miss than hit. But once you find that sweet spot—the balance between tangy cake and smooth shell—you’re golden.
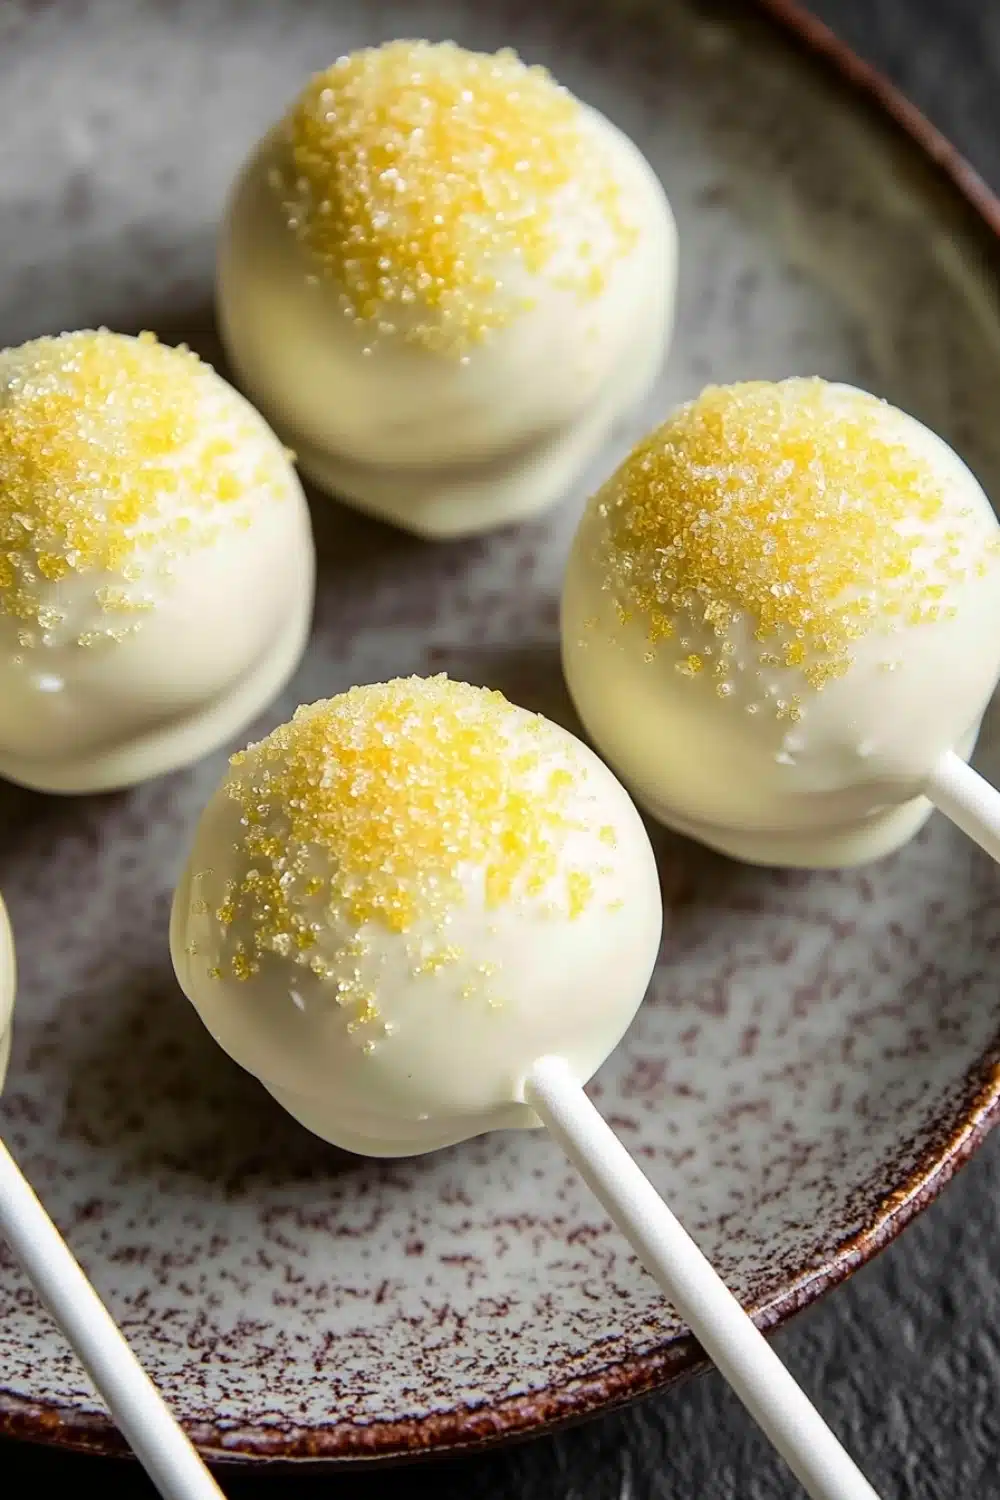
Making lemon cake pops isn’t just baking; it’s art and science colliding. You crumble, fold, and chill until the mix sticks just right to the stick—no one wants a cake pop that’s all crumble and no hold. The white chocolate dip? It’s the final coat of armor, and the yellow sprinkles aren’t just garnish—they’re the pièce de résistance that shouts sunshine on a stick.
These pops aren’t just party favors—they’re mood lifters. Trust me, once you get the hang of the lemon cake pop design, you’ll crave that tangy zing and creamy crunch like nothing else.
For more inspiration, check out these lemon cake pop design ideas that are perfect for any celebration.
Real Life Perks of Lemon Cake Pops
- Perfect party pleasers—bite-sized and mess-free, these pops vanish fast at any shindig.
- The zingy lemon punch wakes up your taste buds like a morning slap—no boring desserts here.
- Easy to prep ahead; chill them overnight, then dip and decorate right before guests arrive.
- Kid-friendly snack that sneaks in a bit of citrus brightness without the usual sugar overload.
- Storage-friendly: stash them in the fridge or freezer and pull out a pop when the sweet tooth calls.

Lemon Cake Pops
- Total Time: 1 hour
- Yield: 24 cake pops 1x
Description
Delightful and tangy lemon cake pops coated in a smooth white chocolate shell, perfect for parties and gatherings. These bite-sized treats combine moist lemon cake with a creamy lemon frosting, dipped in white chocolate and decorated with yellow sprinkles for a cheerful finish.
Ingredients
1 cup all-purpose flour
3/4 cup granulated sugar
1/2 teaspoon baking powder
1/4 teaspoon baking soda
1/4 teaspoon salt
1/2 cup unsalted butter, softened
2 large eggs
1/4 cup sour cream
1/4 cup freshly squeezed lemon juice
1 tablespoon lemon zest
1 teaspoon vanilla extract
1 cup powdered sugar
2 tablespoons unsalted butter, softened (for frosting)
1 tablespoon freshly squeezed lemon juice (for frosting)
1 teaspoon lemon zest (for frosting)
8 ounces white chocolate, chopped
24 white lollipop sticks
1/4 cup yellow sanding sugar or yellow sprinkles
Instructions
Preheat the oven to 350°F (175°C). Line an 8-inch square baking pan with parchment paper, leaving an overhang for easy removal.
In a medium bowl, whisk together the flour, baking powder, baking soda, and salt. Set aside.
In a large bowl, beat the 1/2 cup softened butter and granulated sugar together until light and fluffy, about 3 minutes.
Add the eggs one at a time, beating well after each addition.
Mix in the sour cream, lemon juice, lemon zest, and vanilla extract until combined.
Gradually add the dry ingredients to the wet ingredients, mixing until just combined. Do not overmix.
Pour the batter into the prepared pan and spread evenly.
Bake for 22 to 25 minutes, or until a toothpick inserted into the center comes out clean.
Allow the cake to cool completely in the pan on a wire rack.
Once cooled, remove the cake from the pan using the parchment overhang and crumble it into a large mixing bowl.
In a small bowl, combine the powdered sugar, 2 tablespoons softened butter, 1 tablespoon lemon juice, and 1 teaspoon lemon zest to make the lemon frosting. Mix until smooth.
Add the frosting to the crumbled cake and mix thoroughly until the mixture holds together when pressed.
Using your hands or a small cookie scoop, form the mixture into 24 even balls and place them on a baking sheet lined with parchment paper.
Insert a lollipop stick halfway into each cake ball. Chill the cake pops in the refrigerator for at least 30 minutes to firm up.
Melt the white chocolate in a microwave-safe bowl in 30-second intervals, stirring between each, until smooth.
Dip each chilled cake pop into the melted white chocolate, allowing excess to drip off.
Immediately sprinkle the yellow sanding sugar or yellow sprinkles over the wet chocolate coating.
Place the dipped cake pops upright in a styrofoam block or cake pop stand to set.
Refrigerate the cake pops for 15 minutes or until the coating is firm.
Serve and enjoy your bright and zesty lemon cake pops!
- Prep Time: 30 minutes
- Cook Time: 25 minutes
Explore more:
Buzz in the Kitchen Recipes
Mastering Lemon Cake Pops: From Batter to Bite
The Secret to That Perfectly Tangy Lemon Batter
The magic starts with balancing zest and moisture. Lemon cake batter isn’t just about throwing in citrus; it’s about coaxing out that zing without turning the crumb chalky or dry. Sour cream? A game-changer. It acts like a secret agent, sneaking in moisture and a subtle tang that keeps your pops juicy after baking and crumbling. I’ve seen too many recipes skip it—big mistake. And the eggs? Add ’em one at a time, beating after each addition to build structure and aeration. That fluff? It’s your ticket to cake pops that don’t crumble into sad crumbs.
Also, don’t overlook the baking soda and powder combo. They’re not just there for show—they provide lift and texture that’s light but sturdy enough to handle the subsequent frosting binding. Mix the dry into the wet just until combined—overmixing’s the fast lane to tough, rubbery cake. For me, this step is like walking a tightrope. One slip, and your pops are toast.
Frosting and Forming: Why This Dough Needs Love and Chill
Got your cake baked and cooled? Now, crumble it—no mercy. But here’s where the magic really happens: add the frosting. This isn’t just a sweet binder; it’s a moisture magnet and flavor booster. The combo of powdered sugar, softened butter, lemon juice, and zest creates a creamy, tangy glue. Too little frosting? The balls will fall apart. Too much? They become gummy and impossible to shape. Trust me, it takes some elbow grease and a feel test—press the mixture; it should hold without sticking wildly to your hands.
Forming the balls is a bit of an art form. I’m talking about even size (because uneven pops are party foul) and getting them firm before the dip. Don’t skip chilling. Refrigeration for at least 30 minutes is your friend—this step firms them up so they don’t turn into mush when submerged in molten white chocolate. I learned this the hard way once—dipped a warm pop, and it took a nose dive into the bowl like a clumsy diver. Chill, then dip. Chill, then dip. Repeat mantra.
Fixing the Common White Chocolate Coating Catastrophes
White chocolate is finicky—more diva than dark or milk chocolate. It can seize, clump, or melt into a sad puddle. Here’s the lowdown: melt in 30-second bursts, stirring in between. Rushing this step is a rookie mistake. If your chocolate thickens or seizes, add a teaspoon of vegetable oil or a small splash of heavy cream to smooth it out—don’t dump a lot, or you’ll thin the coating too much.
When dipping, let excess drip off naturally—vigorous shaking or tapping can cause cracks or thin spots on your shell. A steady hand and patience pay off here. Right after dipping, sprinkle your yellow sanding sugar fast but gently—once the shell firms up, sprinkles won’t stick. Use a styrofoam block or a stand to hold them upright; placing them on a flat surface risks cracking or smudging.
The final chill? Non-negotiable. It sets the shell to a satisfying snap and locks in that pop of citrus cheer you worked so hard to create. If your coating cracks after chilling, odds are your cake balls weren’t firm enough to start with—back to the fridge they go!
Lemon Cake Pops FAQs
Absolutely! You can prepare them a day or two in advance and keep them chilled. Just cover tightly to keep the white chocolate shell from sweating.
Nope. Sour cream adds moisture and tang, but if you’re out, plain yogurt or buttermilk works just as well.
Melt in short bursts of 20-30 seconds in the microwave, stirring vigorously between intervals. White chocolate is finicky—don’t walk away, or it’ll turn grainy. Alternatively, use a double boiler and keep the heat gentle.
Yes, freeze them in an airtight container for up to a month. When you’re ready to munch, thaw slowly in the fridge to avoid condensation messing with the coating.
Definitely. They’re bite-sized, not too sweet, and fun to eat—perfect for little hands at parties or as a school treat.